Jira
How to Configure Jira's Custom Onboarding Feature
Transform new user onboarding with Jira's custom configuration. Step-by-step guide for Atlassian admins to create role-specific welcome experiences, track engagement metrics, and boost user adoption.
Introduction
Most enterprises struggle with Jira user adoption. New employees log into Jira for the first time, encounter the generic default onboarding experience, and immediately feel overwhelmed. They don't understand your team's specific workflows, can't find relevant documentation, and have no context for how Jira fits into your organization's way of working.
The result? Lower productivity, frustrated users, and countless hours spent by admins answering the same basic questions repeatedly. This problem multiplies across teams when you're onboarding marketing professionals who need different guidance than software developers, or project managers who work differently than designers.
Fortunately, Atlassian has introduced Jira custom onboarding – a game-changing feature that allows administrators to create tailored welcome experiences for different user roles. Available to Premium and Enterprise customers as of October 2025, this feature transforms how organizations introduce new users to their Jira ecosystem.
Understanding Jira's Custom Onboarding Architecture
Custom onboarding operates at the site level, meaning your configurations apply across all projects within your Jira instance. The system leverages Jira's existing role categorization system, working with the 14 predefined roles that users already select during their initial signup process.
The feature provides four core capabilities that address common onboarding challenges:
- Personalized welcome experiences with custom messaging, branding, and multimedia content
- Role-specific guidance tailored to each of the 14 available user roles
- Embedded resource links to internal documentation and training materials
- Built-in analytics to track engagement and measure onboarding effectiveness
Prerequisites and Initial Setup Requirements
Before diving into configuration, ensure your Jira instance meets these requirements:
Licensing Requirements:
- Jira Cloud Premium or Enterprise plan
- Site administrator permissions
- Continuous release customers (available October 3rd, 2025)
- Bundled release customers (available November 2025)
Technical Prerequisites:
- Access to Settings > Products > Custom onboarding in your admin panel
- Understanding of your organization's role structure and user personas
- Prepared multimedia content (videos, images, documentation links)
- Internal documentation URLs that support Smart Links functionality
Step-by-Step Configuration Guide
Creating Your First Custom Onboarding Experience
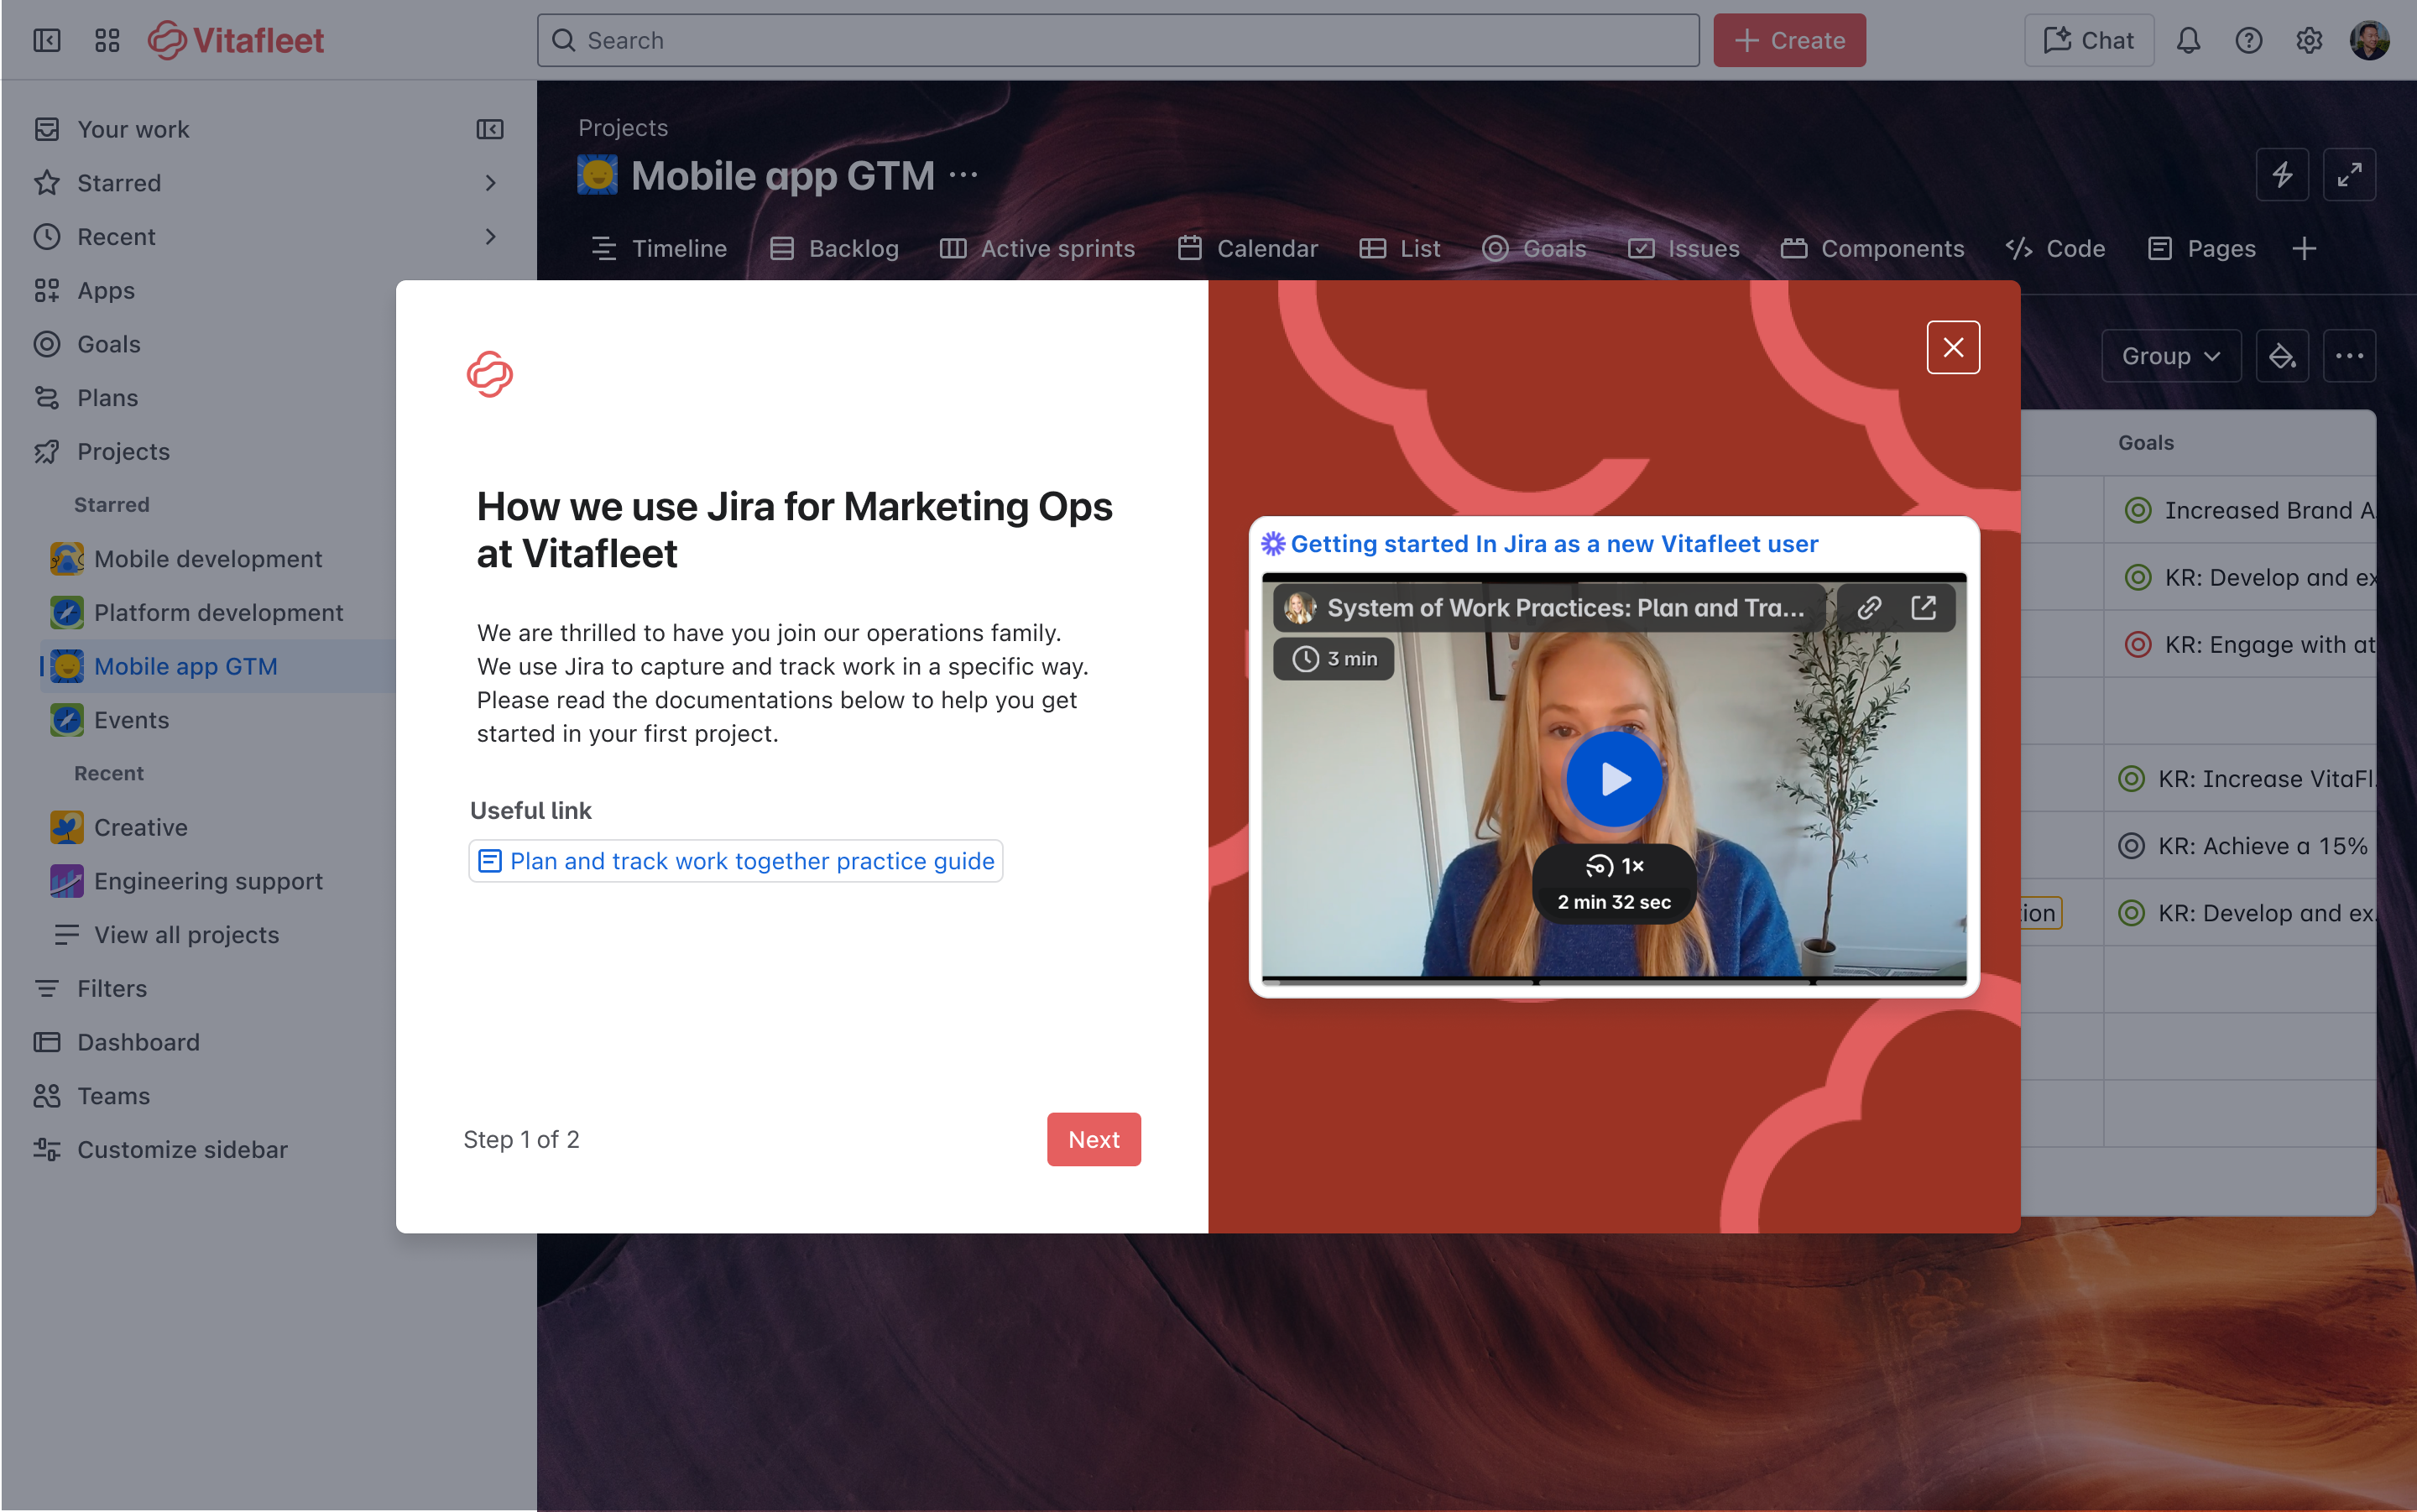
Navigate to Settings > Jira apps and select Custom onboarding from the sidebar. Click Create onboarding to begin the configuration wizard.
Step 1: Define Your Target Audience
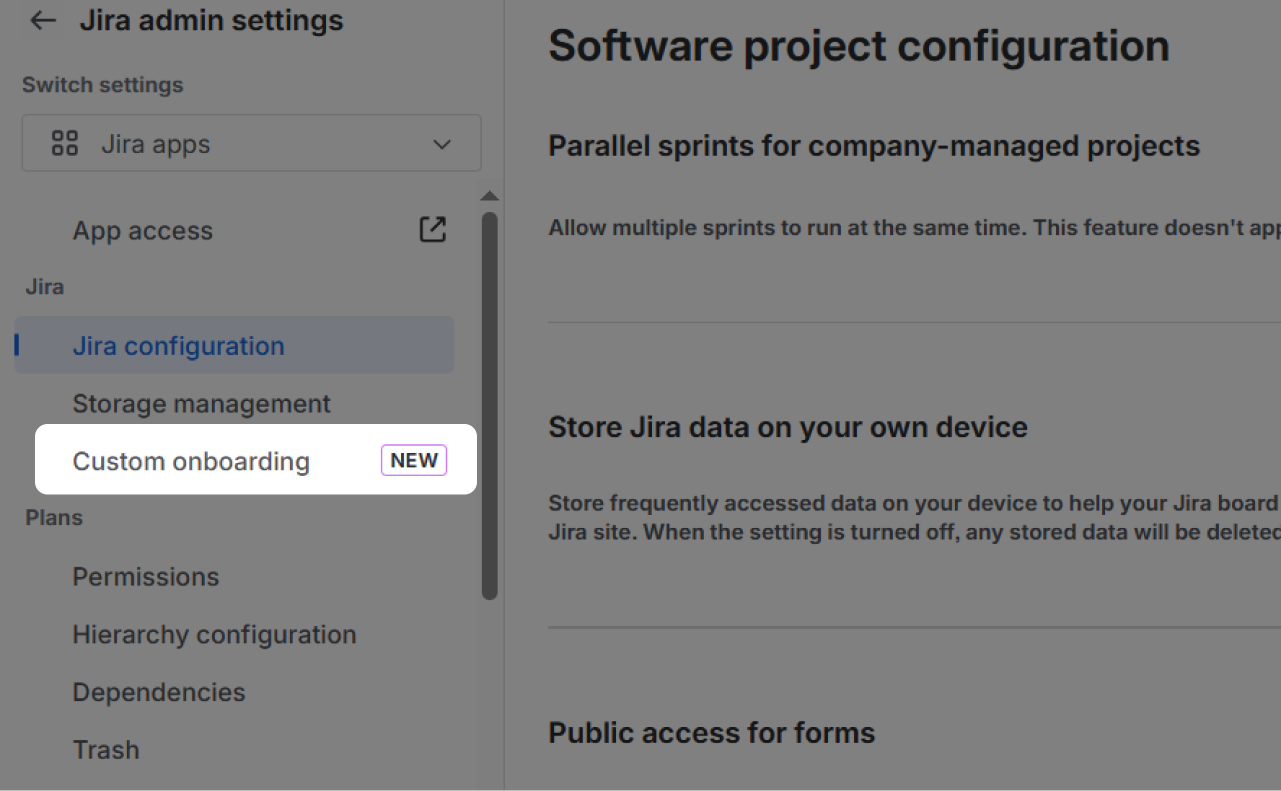
Start by naming your onboarding experience with a descriptive title that reflects the intended user group.
Select the roles you want to target from the 14 available options. You can assign multiple roles to a single onboarding experience, but each role can only belong to one experience. This design decision forces you to think strategically about role groupings.
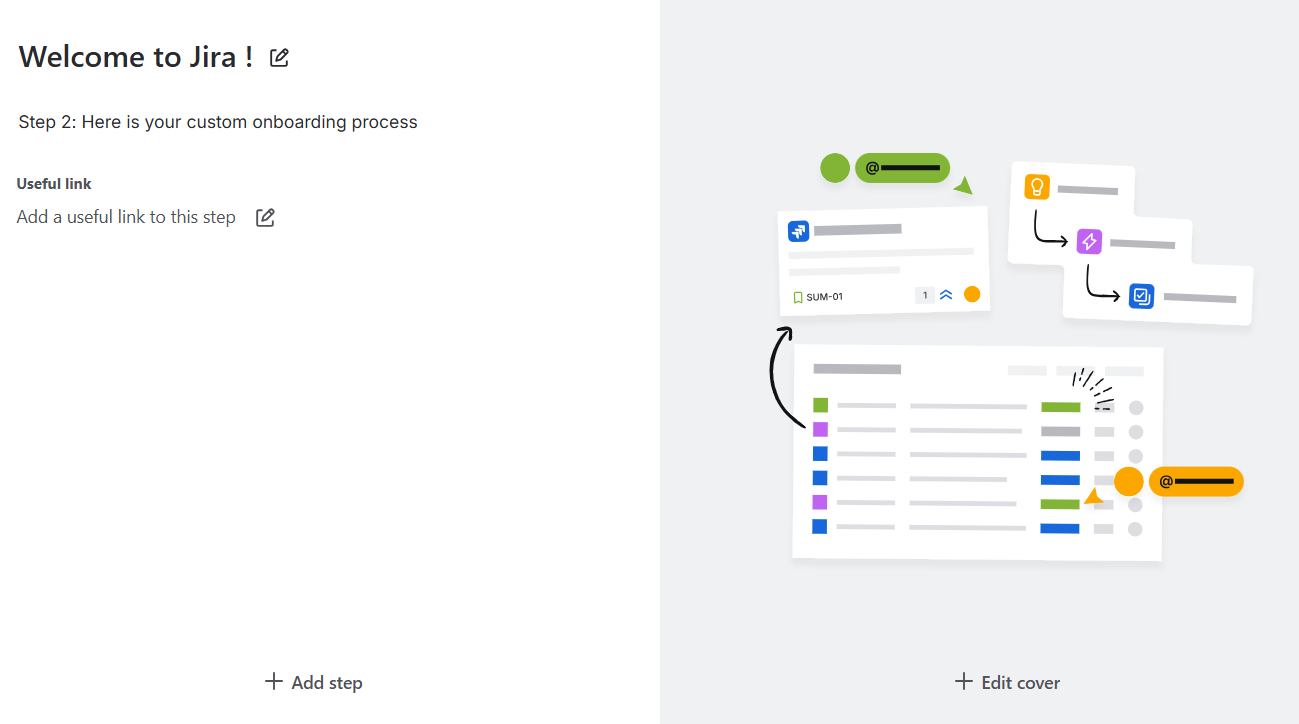
Step 2: Craft Your Welcome Content
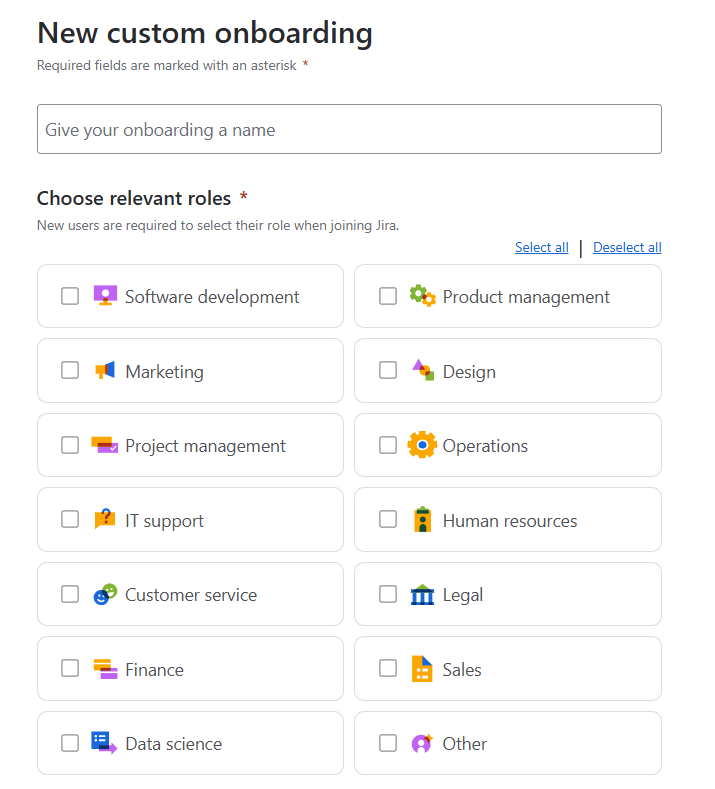
The content editor allows you to customize several elements:
- Custom title: Replace the generic welcome with something specific to your organization
- Welcome message: Provide context about how your team uses Jira and what new users should expect
- Useful links: Add Smart Links to internal Confluence pages, training materials, or process documentation
- Cover media: Upload background images or embed videos from supported platforms (Loom, YouTube, Google Drive, Vimeo, Dropbox, Box)
Pro tip: Keep your welcome message concise but informative. Focus on the "why" of your Jira setup rather than detailed "how-to" instructions.
Step 3: Structure Multi-Step Experiences
You can create up to three steps within each onboarding experience. Use this capability to create a progressive disclosure of information:
- Step 1: General welcome and company context
- Step 2: Role-specific tools and processes
- Step 3: Next steps and resources for ongoing support
Advanced Configuration Strategies
Role-Specific Customization Examples:
For Software Development teams:
- Link to your code release process documentation
- Embed a video walkthrough of your development workflow
- Provide access to relevant Jira projects and boards
For Project Management roles:
- Include milestone tracking tutorials
- Link to budget management templates
- Share escalation procedures and stakeholder communication guidelines
For Marketing teams:
- Connect to campaign tracking workflows
- Provide custom field usage guidelines
- Share brand asset libraries and approval processes
Leveraging Analytics for Continuous Improvement
Jira's custom onboarding includes built-in analytics that provide actionable insights into user engagement. Access these metrics through the onboarding administration panel to understand:
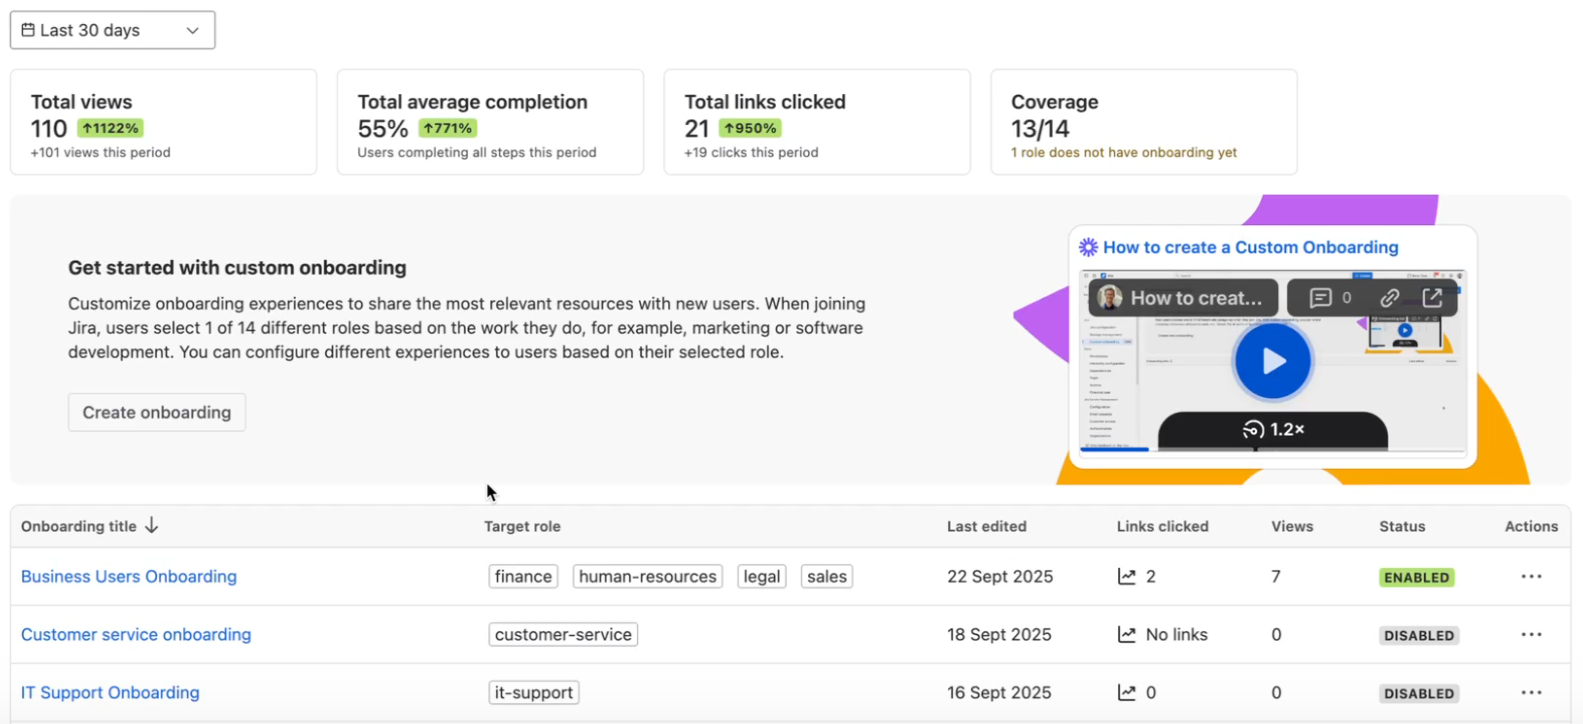
Engagement Metrics:
- Completion rates by role and onboarding experience
- Time spent on each step
- Most frequently accessed resources
- Drop-off points in the onboarding flow
Optimization Strategies:
Use analytics data to identify improvement opportunities:
- Low completion rates: Simplify content or reduce the number of steps
- High drop-off on specific steps: Review content complexity or technical requirements
- Underutilized resources: Reassess link relevance or placement
- Role-specific patterns: Adjust content based on different user group behaviors
Common Implementation Pitfalls and Solutions
Challenge 1: Content Overload
Problem: Cramming too much information into the initial onboarding experience, overwhelming new users.
Solution: Focus on essential information that users need within their first week. Save detailed process documentation for follow-up resources or just-in-time training.
Challenge 2: Generic Role Groupings
Problem: Assigning too many diverse roles to a single onboarding experience, diluting the personalized impact.
Solution: Create more targeted experiences, even if it means additional configuration work. A marketing coordinator and a data analyst may both fall under "business" roles but need different guidance.
Challenge 3: Outdated Content
Problem: Failing to maintain onboarding content as processes and tools evolve.
Solution: Establish a quarterly review process for onboarding experiences. Use analytics to identify when engagement drops, which often signals outdated information.
Challenge 4: Limited Media Integration
Problem: Relying solely on text-based instructions when multimedia would be more effective.
Solution: Leverage supported video platforms to create screen recordings of key processes. A 2-minute Loom video showing your board setup is more valuable than three paragraphs of written instructions.
Integration with Broader Onboarding Workflows
Custom onboarding works most effectively when integrated with your organization's broader employee onboarding processes. Consider these integration points:
HR System Connections:
- Trigger custom onboarding based on employee start dates
- Coordinate with IT provisioning workflows
- Align with security training requirements
Cross-Tool Experiences:
- Link to Confluence onboarding spaces
- Connect with Slack channel invitations
- Integrate with identity management systems
Progressive Disclosure:
- Use Jira custom onboarding for immediate tool orientation
- Follow up with role-specific training sessions
- Provide advanced feature training after initial productivity milestones
Measuring Success and ROI
Track these key performance indicators to demonstrate the value of your custom onboarding investment:
Quantitative Metrics:
- Time to first meaningful contribution in Jira
- Support ticket volume related to basic Jira questions
- User activation rates within first 30 days
- Feature adoption rates by role
Qualitative Indicators:
- User satisfaction scores from onboarding surveys
- Feedback quality during onboarding retrospectives
- Manager reports on new hire productivity
- Self-reported confidence levels with Jira workflows
Future-Proofing Your Onboarding Strategy
As Atlassian continues developing the custom onboarding feature, prepare for potential enhancements:
Anticipated Improvements:
- Expanded role customization beyond the current 14 categories
- Enhanced analytics with more granular tracking
- Integration with Atlassian Analytics for cross-product insights
- Advanced personalization based on user behavior patterns
Scalability Considerations:
- Design onboarding experiences that work across multiple team sizes
- Create modular content that can be mixed and matched for different scenarios
- Establish governance processes for managing multiple onboarding experiences
Conclusion and Next Steps
Jira's custom onboarding feature represents a significant leap forward in user experience management for Atlassian administrators. By moving beyond generic, one-size-fits-all approaches, you can create meaningful first impressions that accelerate user productivity and reduce administrative overhead.
The key to success lies in understanding your users' specific needs, leveraging analytics for continuous improvement, and integrating onboarding with your broader organizational processes. Start with one or two key user roles, measure the impact, and gradually expand your custom onboarding coverage based on what works best for your teams.
Implementation Roadmap:
- Week 1: Audit your current user roles and identify the highest-impact groups for initial custom onboarding
- Week 2-3: Create content and configure your first custom onboarding experience
- Week 4: Launch with a pilot group and gather initial feedback
- Month 2: Analyze engagement data and refine content based on user behavior
- Month 3+: Expand to additional roles and establish ongoing maintenance processes
The investment in thoughtful onboarding configuration pays dividends through improved user satisfaction, reduced support burden, and faster organizational productivity gains. Your future new hires will thank you for taking the time to welcome them properly into your Jira ecosystem.
👉 Contact me for expert Atlassian consulting
Subscribe for more Atlassian automation ideas and real-world tips and strategies.